Distributions are direct links to your coupon(s). You can create multiple distributions for a single coupon. Distributions are located under the Coupon menu item.
1. Click on Distributions

2. Click "Create" on the far right to create a Coupon Distribution. 
3. Fill in your Landing Page details
- Distribution Name - This is internal and will be used in your reporting to show where your coupon was clipped from.
- Status - You can activate or deactivate your distribution
- Landing Page - Select what Landing page you want attached to this distribution. If you have not created a landing page yet you will need to do that first. For more information on landing pages click here.

4. Select your coupon - You can select a coupon to be attached to this distribution.

5. Guest Token Group - Select which Guest Token group you want to assign to the gallery. To learn more about Guest Tokens click here.
6. Tracking Code - If you have 3rd party tracking you want to include you can add it here. Tracking can be placed in two places, on the page load and also after successfully clipping/printing the coupon.

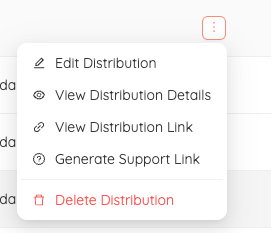
7. Viewing and Editing your gallery - Once your gallery is created you can use the actions tab on the far right to view, edit, and delete the gallery.
- Edit Distribution -Click this button to edit ay settings or add additional coupons to the landing page.
- View Distribution Details - View the current settings for you landing page.
- View Distribution Link - Click this to see open a link to your distribution link.
- Generate Support Link - Use this button to create a one time consumer support link. For more information on Support Links click HERE.
- Delete - click this to delete your landing page.
Distributions are
Was this article helpful?
That’s Great!
Thank you for your feedback
Sorry! We couldn't be helpful
Thank you for your feedback
Feedback sent
We appreciate your effort and will try to fix the article